Software Development Lifecycle (SDLC)
This document describes our Software Development Lifecycle (SDLC), which is how we ship software to production.
It provides guidance, and is not prescriptive—not every step will be relevant to every project. This is because not all projects are equally security-critical, and therefore not all projects should be treated equally. When in doubt about what's needed to ship your project, ask your manager. If you deviate, note the deviation and rationale somewhere that isn't Slack (e.g. a design doc, github issue, etc.)
[!IMPORTANT] Guiding Principle: Always Be Release Ready
- At any time, the latest
developshould be shippable via our deployment pipeline. Build confidence in correctness and security continually throughout the development lifecycle, not only at the end.- Build in vertical slices: split fixes or features into end-to-end increments that can ship independently.
- Separate feature deployment from activation using feature flags.
Process
flowchart TD
  Start[[ ]] --> Step0[Step 0: Ideation and Planning]

  subgraph P[Steps 0-3 can be partly parallelized]
    direction TB
    Step0 --> Step1[Step 1: Design, Specs, and Risk Modeling]
    Step1 --> Step2[Step 2: Implementation]
    Step2 --> Step3a["Step 3a: Create Superchain Ops tasks<br>(L1 upgrades only)"]
    Step2 -->|"If needed"| Step3b[Step 3b: Audit execution]
  end

  Step3a --> Step4a[Step 4a: Alphanet and Optional Betanets]
  Step3b --> Step4a

  Step4a --> Step4b[Step 4b: Final Betanet]
  Step4b --> Step5[Step 5: Testnet rollout]

  Step5 --> Step7[Step 7: Mainnet rollout]
  Step5 -->|"If needed"| Step6[Step 6: Governance proposal]
  Step6 --> Step7
Step 0: Ideation and Planning
Make sure you know, and document, the answers to:
- What is the problem we need to solve?
- What requirements and constraints do we have?
- Who exactly is the customer?
Step 1: Design, Specs, and Risk Modeling
Design Doc
Now that the problem, requirements, and customers are known, create a design doc that describes the solution:
- Create a design doc PR in
design-docsordesign-docs-private(using the templates in those repos). - Share this with customers and design partners to get feedback. Iterate on the design doc until customers are happy with it.
- Announce the design doc PR in #protocol-general. Tag managers from impacted teams so they can choose a representative from their team to review the design doc:
- Product: Sam McIngvale
- DevRel: Matthew Cruz (soyboy)
- Ecosystem: Faina Shalts
- Protocol: Matt Slipper
- Proofs: Paul Dowman
- Platforms: Alfonso Munoz de Laborde
- EVM Safety: Matt Solomon
- Developer Advisory Board (DAB): Wildmolasses (Ed) via #ext-dab Slack channel
- Schedule a design review, include the team representatives and any other stakeholders/customers on the invite.
Specs
Once the design is finalized, if it modifies smart contracts, consensus, or protocol functionality, write/update specs in the specs repo.
Good specs will clearly document assumptions and invariants, see the AnchorStateRegistry specs as an example of well-written specs.
Determine governance impact
As you develop a design for your change, you’ll need to determine if the change requires a regular governance process or a maintenance upgrade process. Changes that affect consensus, touch smart contracts on L1, modify predeploys, or impact transaction ordering will generally require a regular governance process. If you’re unsure, consult Ben Jones.
For full criteria and examples for determining if governance is needed, refer to the Governance Criteria and the Law of Chains user protections.
Risk Modeling
This will typically, but not always, be in the form of threat modeling. Reach out to the EVM Safety team for guidance or training on threat modeling.
Your initial threat model will inform engineering planning by helping answer the questions of what tests are needed,
what edge cases to cover, what new or updated monitors are needed, what runbooks need to be written or modified, and audit needs.
For more info on determining audit needs, see our audit framework and audits.md.
Once the initial threat modeling is done, extract all answers into issues (or wherever you are tracking project tasks) for tracking purposes.
Be sure to revisit and update your threat model as the project evolves, and as mitigations are implemented.
Step 2: Implementation
At this stage, you can start writing your code. Make sure you follow these standards:
- All consensus code must be behind a feature flag, decoupled from the hardfork name (see https://github.com/ethereum-optimism/design-docs/blob/main/protocol/decoupled-features.md).
- All changes must go through code review, and have test automation. Use coverage tooling and reports to identify testing gaps.
- For new features, add acceptance tests.
- For smart contracts the specs must clearly define assumptions and invariants as described above, and you must have ~100% test coverage.
- Include any changes to OPCM and VerifyOPCM.
- Make sure to give access to and tag @wildmolasses (Ed) from the Developer Advisory Board in any (draft) specs.
Step 3a: Create Superchain Ops tasks (L1 upgrades only)
If your change modifies L1 smart contracts, you’ll need a superchain-ops playbook to execute the multisig transactions.
Contact Blaine Malone for help with this.
Step 3b: Audit execution
- See
audits.mdfor more information on how to get approval for and execute an audit. - Make sure to leave sufficient leave time for scheduling the audit.
- Only start the audit once code, specs, and tests are complete.
- The audit must be completed, with fixes implemented, before Sepolia rollout.
- If there are high severity issues, do NOT proceed to the next step after fixing them—instead, perform a retro to see how those issues got in, and what else may have been missed as a result.
Step 3c: Draft Governance proposal
- Once code and specs are complete, the governance proposal should be drafted and shared with the Developer Advisory Board (tag @wildmolasses (Ed) in the #ext-dab Slack channel
- This first draft of the governance proposal may be shared as a notion or google doc, and at this stage does not need to include elements like the absolute prestate hash, transaction payloads etc.
- It should all other information mentioned the governance proposal template like the specs, motivation and technical documentation
- This allows the Developer Advisory Board to pre-read the proposal before its publication, and provide early feedback.
Step 4: Alphanet/Betanet devnet rollout
[!WARNING] Prerequisites for the final betanet All of the steps above MUST be completed before the final betanet. That includes:
- Specs
- Completion of risk modeling
- Implementation of mitigations identified by risk modeling (tests, monitors, runbooks, etc.)
- Governance impact analysis and draft proposal
- Audit execution and required fixes
Next, it’s time to roll out to the Alphanet, then the Betanet. See the release process and acceptance testing docs for more details.
You may deploy to multiple betanets if needed, for example to rehearse an upgrade process, but the final betanet must have no known issues and must result in no new issues being discovered.
Step 4a: Publish Governance proposal
- Once the absolute prestate hash, Monorepo Commit Hash, OPCM version, L1 transaction payload are known, they should be added to the draft governance proposal
- At this point, the DAB should have reviewed the draft and provided feedback
- Obtain Foundation and Legal approval
- Loop in Ben Jones, Julian Wahl and Bobby Dresser from the Foundation
- Loop in Eric Van Wart from legal
- Post the proposal on the governance forum
- Let the DAB lead (wildmolasses (Ed) know via Slack)
- Once published to the forum, the approval and veto periods begin, and take approximately 14 days to complete for non-maintenance upgrades, and 7 days for maintenance upgrades
The Sepolia rollout can happen in parallel.
Step 5: Sepolia rollout
Sepolia is a production network, therefore has the same standards and security requirements as mainnet. This is why the betanet in the prior step must have no known issues and must result in no new issues being discovered.
Coordinate with DevRel and external partners that may be affected. Sepolia must match mainnet as much as possible, including for partner configurations.
Step 7: Mainnet rollout
- Remove the
rcsuffixes from your releases. - Schedule the mainnet upgrade after the veto period expires.
- Coordinate with EVM Safety to schedule the mainnet multisig upgrade.
- The Product/Dev/PMO Leads to go through their checklist to ensure all stakeholder needs, documentation, and communications are in place. This includes working with Marketing, DevRel, Data, Finance, Foundation, etc.
- Monitor post-release with on-call coverage, then collect customer feedback on the overall process and track it for future process improvements.
Failure Mode Analysis (FMAs)
Overview
Our Failure Mode Analysis is loosely based on FME(C)As from aerospace engineering and are intended to shift left the process of thinking through the risks associated with a project, so that mitigations can be planned for and implemented earlier rather than later.
Writing a Failure Modes Analysis
As part of the effort towards working in the open, we have open sourced both the FMA process and the FMA template so protocol developers from the whole collective can adopt this process.
To write the FMA for your project, follow the FMA template. You can use the many existing FMAs as examples to understand how to write yours.
FMAs live in the design-docs or design-docs-private repo.
Creating a Threat Model
Alternatively to an FMA, you can also create a threat model. To do so, duplicate this board in Miro and follow the instructions inside. Use other threat models for inspiration, and refer to them when possible instead of duplicating content.
Determine Audit Requirements
It is the responsiblity of the project DRI to determine if an external audit is needed. The knowledge obtained in writing the FMA will help you determine the audit requirements for your project. EVM Safety is available if you need advice on this step.
For context, please read this framework from John Mardlin.
Using threat modelling to determine audit requirements
If using threat modelling, it is possible to use a more deterministic approach to answer whether an audit is needed or not.
To do so, audits wouldn't be initially included in developing the threat trees. Once the trees are completed, depending on the severity and likelihood of the outcomes, audits can be added as mitigations.
If the severity or likelihood of a negative outcome is high (safety outcome possible with red or purple likelihood), you should consider first if there are any alternative mitigations that you can employ, such as refactoring the project or adding redundancies or safeguards. An audit only provides a limited amount of safety.
It is suggested that safety outcomes with yellow or worse likelihood undergo an audit. Likewise for liveness outcomes with red or worse likelihood. The effectiveness of the audit in lowering likelihoods in the threat model is left to the DRI.
Partners might require an audit, we do not have a process to determine this at the moment, but you should socialize the project with the affected partners and gather feedback.
This leaves that some projects might not need an audit, in particular those where safety outcomes are all green before audits, and liveness outcomes are at most yellow, also before audits.
Table of Failure Modes Analyses
Audit Process
Context
When teams need an audit, there should be a clear process with owners for all required steps: defining requirements and invariants, getting internal approvals, working with program management, talking to auditors, determining how many audits to get, what kinds of audits, negotiating audit prices, scheduling the audit, determining if a fix review is needed, and what to do with the results of an audit.
This document describes the use of software audits at Op Labs. It includes:
- An itemized step-by-step guide.
- Choosing a provider and preparing for the audit.
- Executing the audit.
- Reacting to the results of the audit.
- Updating this process based on results
The resulting process integrates with the SDLC and enlists PgM and EVM Safety to help the Tech Lead execute the steps that are common to all audits, so that effort and uncertainty are minimized.
For further context on this process, you can read this companion document and the references.
Summary
-
- The need for audits is determined during Risk Modeling in the Design Phase of the SDLC.
-
- During the Design Review, start a Security Readiness Review document, which will be updated as necessary.
-
- When implementation and testing are about two weeks from the release date, complete the Security Readiness Review document and arrange an audit. If using Spearbit, share your Security Readiness Review document in the #oplabs-spearbit-external channel and tag
@Sharon Ideguchi&@Marc Nicholsonin your request. If you do not have access to the Slack channel, please contact EVM Security.
- When implementation and testing are about two weeks from the release date, complete the Security Readiness Review document and arrange an audit. If using Spearbit, share your Security Readiness Review document in the #oplabs-spearbit-external channel and tag
-
- This will result in an SOW from Spearbit, which you'll have to log in the Zip system.
-
- Make all required fixes and have them reviewed.
-
- If any audit findings are high severity and this is the last scheduled audit:
- 8.1: Perform a retro.
- 8.2: Perform another audit, go back to 2.
Note: If you identify that a new audit vendor will be required, you should start the onboarding process as soon as possible. The Zip request for new auditors will need to include legal agreements as well as the SOW. Approval can take several weeks and is a requirement for the audit starting.
Audit Procurement
We use Spearbit as our preferred auditing services provider and have established a retainer with them to streamline approval. However, the feature team can choose a different provider from this list, from past engagements, or from any other source if they have a strong reason to go outside of Spearbit.
Auditors must agree to review the fixes to the vulnerabilities reported. Auditors not wishing to agree to this step should not be selected.
The Security Readiness Document is one of the deliverables from the design review and the primary artifact needed to schedule an audit. This document will be updated as necessary during the delivery lifecycle. It contains:
- A summary of the project (or a link to a suitable summary if it already exists).
- All relevant links to the project documentation, including specs and FMAs.
- The scope for the audit.
- The desired start and end date for the audit.
Once the Security Readiness Document has been submitted, an SOW will be obtained from the vendor for approval on Zip by:
- Choosing "Request a Purchase/Vendor Onboarding/Purchase Renewal".
- Under "What are you looking to purchase?" select "Other".
Audit Execution
A devnet deployment is a requirement for the audit execution. As the date for the alphanet deployment is known with certainty, a date for the audit can be agreed so that the audit can be executed in parallel with the alphanet and betanet deployments and acceptance testing, and concluded before the testnet deployment.
We prefer to communicate with auditors over Slack during the audit. Questions from auditors should be answered promptly and carefully. These questions reveal gaps in the specifications or the scope, which should be amended accordingly.
Each vulnerability disclosed will be considered separately, fixed in an individual commit, and reviewed again by the auditors in the repo.
For all audit findings that we will fix as part of a later feature, create an issue for each finding in the monorepo. The issue title should be the finding title, the description should link to the audit report, and the issue should be labeled "TBD".
After Each Audit
Once all the fixes are applied and reviewed, the project lead should upload the final audit report to our repo. Please make sure that the keccak256 digest of every audited file is included in the report.
If a valid high severity vulnerability was found, and this is the last expected audit for the project, a post-mortem must be conducted and another audit of the same type must be scheduled. These new audits follow the same process as any other audit.
Emergency Process
The audit process is tied to the SDLC process. A fast-track audit process would only be needed if we find out that we need audits later in the SDLC process, most likely as a result of updates to the risk modeling or excessive vulnerabilities in the last scheduled audit. The process described above is still applicable in these cases.
If the audit process is started in later stages of the SDLC, the documentation will be ready and can be assembled into the Security Readiness Document by including a summary of the project, if that does not yet exist.
We already know that we need an audit, and we can safely assume that an external audit by Spearbit will fulfill the requirements.
The audit request still needs to be approved via the Zip process above.
Updating This Process
This process will be reviewed if SEV0 or SEV1 incidents are revealed during production, reported through a bug bounty, or caught in the last audit before production. The post-mortem might recommend updating this process.
Conversely, this process can also be reviewed with the goal of relaxing its requirements if no SEV1 or SEV0 bugs or incidents have happened in production, via the bug bounty, or in any last audit for at least six months.
References
- Additional context on creating this process
- Calibration of this process against past audits
- Repository with all audit reports
- Our current framework for audits - OP Labs forum post
- An attempt to put an audit process in place - Issue template
- EVM Safety docs on managing audits - Security Audits, Audit FAQs, How to Select an Audit Firm
- Audit Requirements for Fault Proof Contracts
- Audits and shipping secure code from @Paul Dowman summarizing Proofs informal audit framework and adding some ideas.
Audit Post-Mortem
It is not realistic to ask of anyone to either build code completely free of bugs, nor to catch all bugs in code that has already been written. However, we can demand that no severities of a certain category are found after applying a number of security measures. In particular, we want to ensure that SEV1+ bugs are never found in the last pre-production layer or during production.
This is a process to apply when this expectation is not met, and is based in reasonable expectations from all involved, with no one expected to have extraordinary capabilities.
A piece of code is made progressively bug-free by applying layers of security. Unit testing, end-to-end testing, invariant testing, formal verification, peer reviews, internal audits, external audits and bug bounties are all layers of security.
If a SEV1+ bug is found too close to production, it can only be for two reasons:
- At least one security layer underperformed, probably more than one.
- Not enough security layers were applied.
By comparing the bug found and the security layers, it should be obvious to see if any of them underperformed by assessing the kind of bugs that should reasonably caught in it.
- Did the bug pass through some code that should have been covered by unit testing?
- Maybe the bug depended on the interaction between several components, is this a known scenario that is not covered by end-to-end testing?
- We do invariant testing, but we didn’t test the invariant that would have revealed the bug?
- Is the bug known to the security researcher community at large, but the audits missed it?
If a security layer is found to have underperformed, then the solution should be to strengthen it.
However, maybe our existing layers performed reasonably well, but we just didn’t apply enough of them. Maybe the bug was of the kind that would have been caught in an audit, only that we didn’t do one. Maybe the codebase was too complex for all issues to surface in a single audit or contest.
In that case, it might be that we misclassified the risk or complexity of the code. The process should be strengthened so that risk and complexity are correctly identified.
Finally, it might just be that risk and complexity were correctly identified, all security layers performed reasonably well, and we still got a bug. That still means that we need more layers, so then the only thing that is left is that the table that tells you how many audits you need is not demanding enough. In that case we shift the requirements to the left, so that the same risk and complexity get more security layers than before.
Audit Request Template
Use this template to communicate estimates and get approval for an audit. Please fill out the relevant sections and get approval from the folks listed below. Once you have received approval, you can engage with audit firms on details of the audit and request quotes. A zip request can then be filed to get spend approval.
Overview
Link to Security Readiness Document
Timeline and key stakeholders:
When?
Audit Dates:
Planned Release:
Who ?
Auditors:
OP Labs Facilitators:
Costs
Anticipated Number of weeks:
Expected Cost: ???
Approved
Not started Karl Floersch
Action item:
- Create a formal zip request once this document has been reviewed and approved.
References
This template supersedes the Audit Request template.
Security Readiness Template
Release Process
Protocol upgrades run on a regular schedule. This helps resolve some of the challenges we've faced in the past:
- No more waiting 3-4 months between hard forks
- Teams don't need to rush features to "catch" an upgrade
- Everyone knows when the next release is coming
- We have the opportunity to find integration bugs earlier
- Missing a train isn't a big deal - there's always another one coming
The thousand-yard view of our release process is as follows:
- Features are developed according to a stable-trunk development model.
- Features are deployed to an Alphanet for initial acceptance testing.
- If the feature works on Alphanet, it gets deployed to a Betanet for additional testing and upgrade process validation.
- If the feature works on Betanet, it gets deployed to the Sepolia Testnet for governance review.
- If governance passes, the feature is deployed to mainnet.
You will need to budget roughly 6 weeks from the time your feature is code-complete to the time it is deployed on mainnet, exclusive of audit time. Working backwards from mainnet deployment, the rough timeline is as follows:
| Time | Activity |
|---|---|
| T | Mainnet Activation |
| T-1 week | Governance veto starts |
| T-2 weeks | Cut mainnet release, distribute to node operators |
| T-3 weeks | Governance vote starts |
| T-4 weeks | Governance review starts |
| T-4 weeks | Betanet deployment and acceptance testing |
| T-5 weeks | Alphanet deployment and acceptance testing |
| T-6 weeks | Feature is code-complete |
Check out the release calendar for more information on the schedule.
Alphanets
The Alphanet is the initial integration environment for protocol upgrades. Its primary purpose is to validate that new features work correctly on a deployed network running real infrastructure before moving on to broader integration and upgrade testing.
The Alphanet can contain any combination of L1 and L2 upgrades. It is entirely acceptable to have an Alphanet with only L1 upgrades, and vice versa. By decoupling these two types of upgrades, we can increase our throughput and deployment flexibility.
The scope of each Alphanet is finalized during the weekly Protocol Upgrades Call on Tuesdays. To put in a request for an Alphanet once the scope has been finalized, create a new issue on the devnets repo.
Betanets
The Betanet validates a complete upgrade that will be deployed to a production networks. Unlike the Alphanet, the Betanet performs the actual upgrade process and confirms that all features work together as intended.
Betanets are deployed every three weeks, and contain the features that passed the Alphanet. If there are no passing features, the Betanet will be cancelled.
The scope of each Betanet is finalized during the weekly Protocol Upgrades Call on Tuesdays. To put in a request for a Betanet once the scope has been finalized, create a new issue on the devnets repo.
Acceptance Testing
Promoting a feature from Alphanet to Betanet and beyond is contingent upon the feature passing automated acceptance tests. See the Acceptance Testing document for more information.
Testnet
The Sepolia Testnet is the first public deployment of protocol upgrades. This allows ecosystem partners to test the upgrades in a stable environment and runs in parallel with the governance process. Unlike Alphanets and Betanets, the Testnet directly impacts external users and applications and is considered "production."
TO provide sufficient time for infrastructure providers to upgrade their systems, Testnet releases must be cut at least 1 week in advance of any hardfork activation.
All features must go through an Alphanet and a Betanet before being deployed on Testnet. This means that you should target having your features deployed to the Alphanet and Betanet right before the gov cycle at the very latest.
See the release calendar for the most up-to-date information on the release schedule.
Release Calendar
The calendar below shows our planned governance cycles, Alphanets, and Betanets. Each event links out to the GitHub issue describing it in more detail.
Acceptance Testing
Acceptance testing ensures OP Stack networks are feature-complete, reliable, and contain features which are ready for promotion.
The Platforms team will compile a Release Readiness Process (RRP) document, which will outline how to acceptance test devnets. This will include a list of tests to run - the Release Readiness Checklist (RRC). They will originally be run manually, but we'll automate them over time.
By automating validation and enforcing quality gates, we reduce risk and increase confidence in releases. Much of this is facilitated by a new tool, op-acceptor, which can run standard Go tests against OP Stack networks and track that network's readiness for promotion. Acceptance testing is a prerequisite for networks to promote from Alphanet, to Betanet, to Testnet.
This is a shared responsibility between the Platforms and the feature teams:
| What Is It | Who Does It |
|---|---|
| Maintains acceptance testing tooling | Platforms Team |
| Writes acceptance test for network liveness | Platforms Team |
| Runs acceptance tests | Platforms Team |
| Writes acceptance test for specific features | Feature Team |
| Performs upgrades | Feature Team |
The Platforms team is responsible for running acceptance tests against each network. To coordinate your feature's acceptance testing, contact Stefano (stefano), Platforms Protocol DevX Pod (@Protocol DevX Pod) or Platforms Team (@Platforms Team) on Discord.
Tooling
The acceptance tests themselves are written in Go and are run by op-acceptor within the op-acceptance-tests directory of the optimism monorepo. op-acceptor provides a high-level framework for registering, running and viewing the results of acceptance tests.
Tests
To add new acceptance tests see the README for instructions on how to do this.
Release Readiness Process (RRP)
Overview
This document defines the process and expectations for devnet releases in the OP Stack. It establishes a consistent framework for determining when a devnet is ready for release and how pass/fail determinations are made. By following these procedures, we can ensure that devnets meet quality standards before release.
While the Platforms team serves as the primary custodian of this release readiness process, its success relies on collaborative ownership between Platforms and Protocol as well as contributions from across the organization.
Roles and Responsibilities
| Role | Responsibilities |
|---|---|
| Platforms Team | • Maintain the Release Readiness Process • Run acceptance tests • Make final pass/fail determinations |
| Feature Teams | • Write and run feature-specific tests • Fix identified issues in their features |
Objectives
The primary objectives of the Devnet Release Readiness process are:
- Release production networks without critical bugs
- Ensure feature coverage through comprehensive testing
- Establish a clear process for devnet promotion decisions
Release Readiness Process
Prerequisites
Before a devnet can be considered for release, the following prerequisites must be met:
- All new features must have acceptance testing coverage in op-acceptance-tests
- The acceptance tests, as defined by the Release Readiness Checklist, should be passing on a local kurtosis-based devnet
- The risk modelling for the in-scope features should have been started
Readiness Phases
The devnets are expected to be live for short periods of time. For example, alphanets will be decomissioned after three weeks.
1. Deployment
- A devnet is deployed according to the standard process
- Basic infrastructure checks ensure the network is operational (manually for now; to be automated)
2. Acceptance Testing
We work through the Release Readiness Checklist, which includes:
- Automated acceptance tests (using op-acceptor)
- Manual acceptance tests
- Feature teams run specific feature tests
- Platform runs security and load tests
- Exploratory testing is run by all teams (probing of the system looking for things that we previously missed)
3. Results Analysis
- Each of the test results are categorized, in line with our internal incident severity matrix, by their potential impact had they been on mainnet:
- Catastrophic (SEV 0): Critical to catastrophic issue that would warrant public notification, leadership awareness (and potential involvement), and potential consultation with legal. A large number of users are impacted by complete or severe loss of functionality, and SLAs have been broken
- Critical (SEV 1): Critical issue that would warrant public notification. A large number of users are impacted by severe loss of functionality, and SLAs may have been broken
- Major (SEV 2): A functionality issue that would actively impact many user' ability to transact, or a critical issue impacting a subset of users
- Minor (SEV 3): Stability or minor customer-impacting issues that would require immediate attention from service owners
4. Release Determination
- The Platforms team makes the final pass/fail determination
- A devnet must have ZERO catastrophic or critical issues (SEV 0 or 1) to be considered for promotion
- Major issues must have mitigation plans before promotion
- Minor issues are documented but don't block promotion
5. Release
When ready, the devnet is made live and public.
Integration with Existing Release Process
The Devnet Release Readiness process integrates with the existing Release Process as follows:
- Alphanet: Before promotion to Betanet, it must pass the Release Readiness process
- Betanet: Before promotion to Testnet, it must pass the Release Readiness process with stricter criteria
- Testnet: All features must have successfully passed through Alphanet and Betanet before deployment
Enforcement
Devnets shall not be released or promoted without following the release process described in this document. The Platforms team serves as the custodians of this document and guardians of the releases, with authority to block promotion of devnets that do not meet the release readiness criteria.
Tools and Resources
- op-acceptor - The acceptance testing framework
- op-acceptance-tests - Repository of acceptance tests
- devnets - The Optimism devnet environment
- Acceptance Testing - Additional context on acceptance testing process
Future Considerations and Improvements
Here are some ideas for future iterations of this process:
- After each release, a retrospective to identify process improvements
- A Release Coordinator role to coordinate the overall release process, track progress, facilitate communication, and document decisions
- A per-devnet Release Readiness Checklist (RRC) to define specific requirements for each devnet
- Public usage phase to collect feedback from the general public
- Injection testing to see how we can break the network and test incident response runbooks
- Communication through dashboards and weekly calls
- Detailed Release Decision Documentation including summary of test results, list of issues, mitigation plans, and recommendations
- Test Results Reporting through the op-acceptor dashboard and Release Readiness Reports
- Test results comms, including:
- The op-acceptor dashboard, showing test status and results
- A Release Readiness Report documenting all tests, issues, and recommendations
- Updates in the weekly Protocol Upgrades Call
- Security
Release Readiness Checklist (RRC)
This document provides a detailed checklist of requirements that devnets must meet to be considered ready for release. These are specific tests, metrics, and criteria that are evaluated as part of the Release Readiness process. The most up-to-date list can be found in the Optimism monorepo's op-acceptance-tests.
The criteria for the checks below apply to all devnets (alphanet, betanet, testnet, etc.) and should be considered a good minimum standard for acceptance.
Sanity Check
A new Kubernetes-based network typically requires about 30mins to fully startup and settle. After this, we sanity check the basic network health.
- Check the Superchain Health Dashboard
- Setup:
- Select infra_env=dev, infra_network=
, security_network1=
- Select infra_env=dev, infra_network=
- Checks:
- Overall Infra reports "Healthy"
- Overall Chain Progression Health reports "Healthy"
- Dispute Mon Security Health 1 reports "Healthy"
- Faultproof Withdrawals Security Health 1 reports "Healthy" (if applicable)
- OP-Challenger Health reports "Healthy" (if applicable)
- Setup:
- Check the SLA dashboard
- Setup:
- Select the correct network
- SLO Evaluation Window = "10m", Period = "Last 30 minutes"
- Checks:
- Overall SLA should be >=99%
- Setup:
- Check the Bedrock Networks dashboard
- Setup:
- Select the correct network
- Period = "Last 30 minutes"
- Checks:
- Chain heads are increasing as expected (unsafe, safe, l1 heads, etc)
- Divergence < 1 for all nodes
- Peer counts are nominal
- Setup:
- Check the Batcher Dashboard
- Setup:
- Select the correct network
- Period = "Last 30 minutes"
- Checks:
- Block height is stricly increasing
- RPC Errors are 0
- No more than 1 pending transaction at any one time
- Setup:
- Check the Proposer Dashboard
- Setup:
- Select the correct network
- Cluster = "oplabs-dev-infra-primary", Period = "Last 30 minutes"
- Checks:
- Proposed Block Numbers are increasing
- Publishing error count is zero (no-data)
- Balance (ETH) is non-zero
- Setup:
- Check the Challenger Dashboard
- Setup:
- Select the correct network
- Period = "Last 30 minutes"
- Checks:
- Should see games in progress
- Challenger Error Logs should be empty (no data)
- Setup:
- Check the Dispute Mon Dashboard
- Setup:
- Select the correct network
- Period = "Last 30 minutes"
- Checks:
- No incorrect forecasts / incorrect results or alerts
- Note: It can take awhile for this to show up
- Error Logs should be empty (no data)
- No incorrect forecasts / incorrect results or alerts
- Setup:
- Check the Conductor Mon Dashboard
- Setup:
- Select the correct network
- Period = "Last 30 minutes"
- Checks:
- Leader count should be 1
- Errors should be 0
- Should be showing all the nodes, conductors all unpaused and healthy
- Setup:
- Alerts for the devnet
- In Slack, check our #notify-devnets channel
- All P1 alerts have either been addressed or have a remediation plan
- In Slack, check our #notify-devnets channel
Feature Verification
Note: For testing a flashblocks-enabled network, refer to this (Flashblocks RRC](https://www.notion.so/oplabs/Flashblocks-Release-Readiness-Checklist-1faf153ee16280ac80d8cda0162f2392).
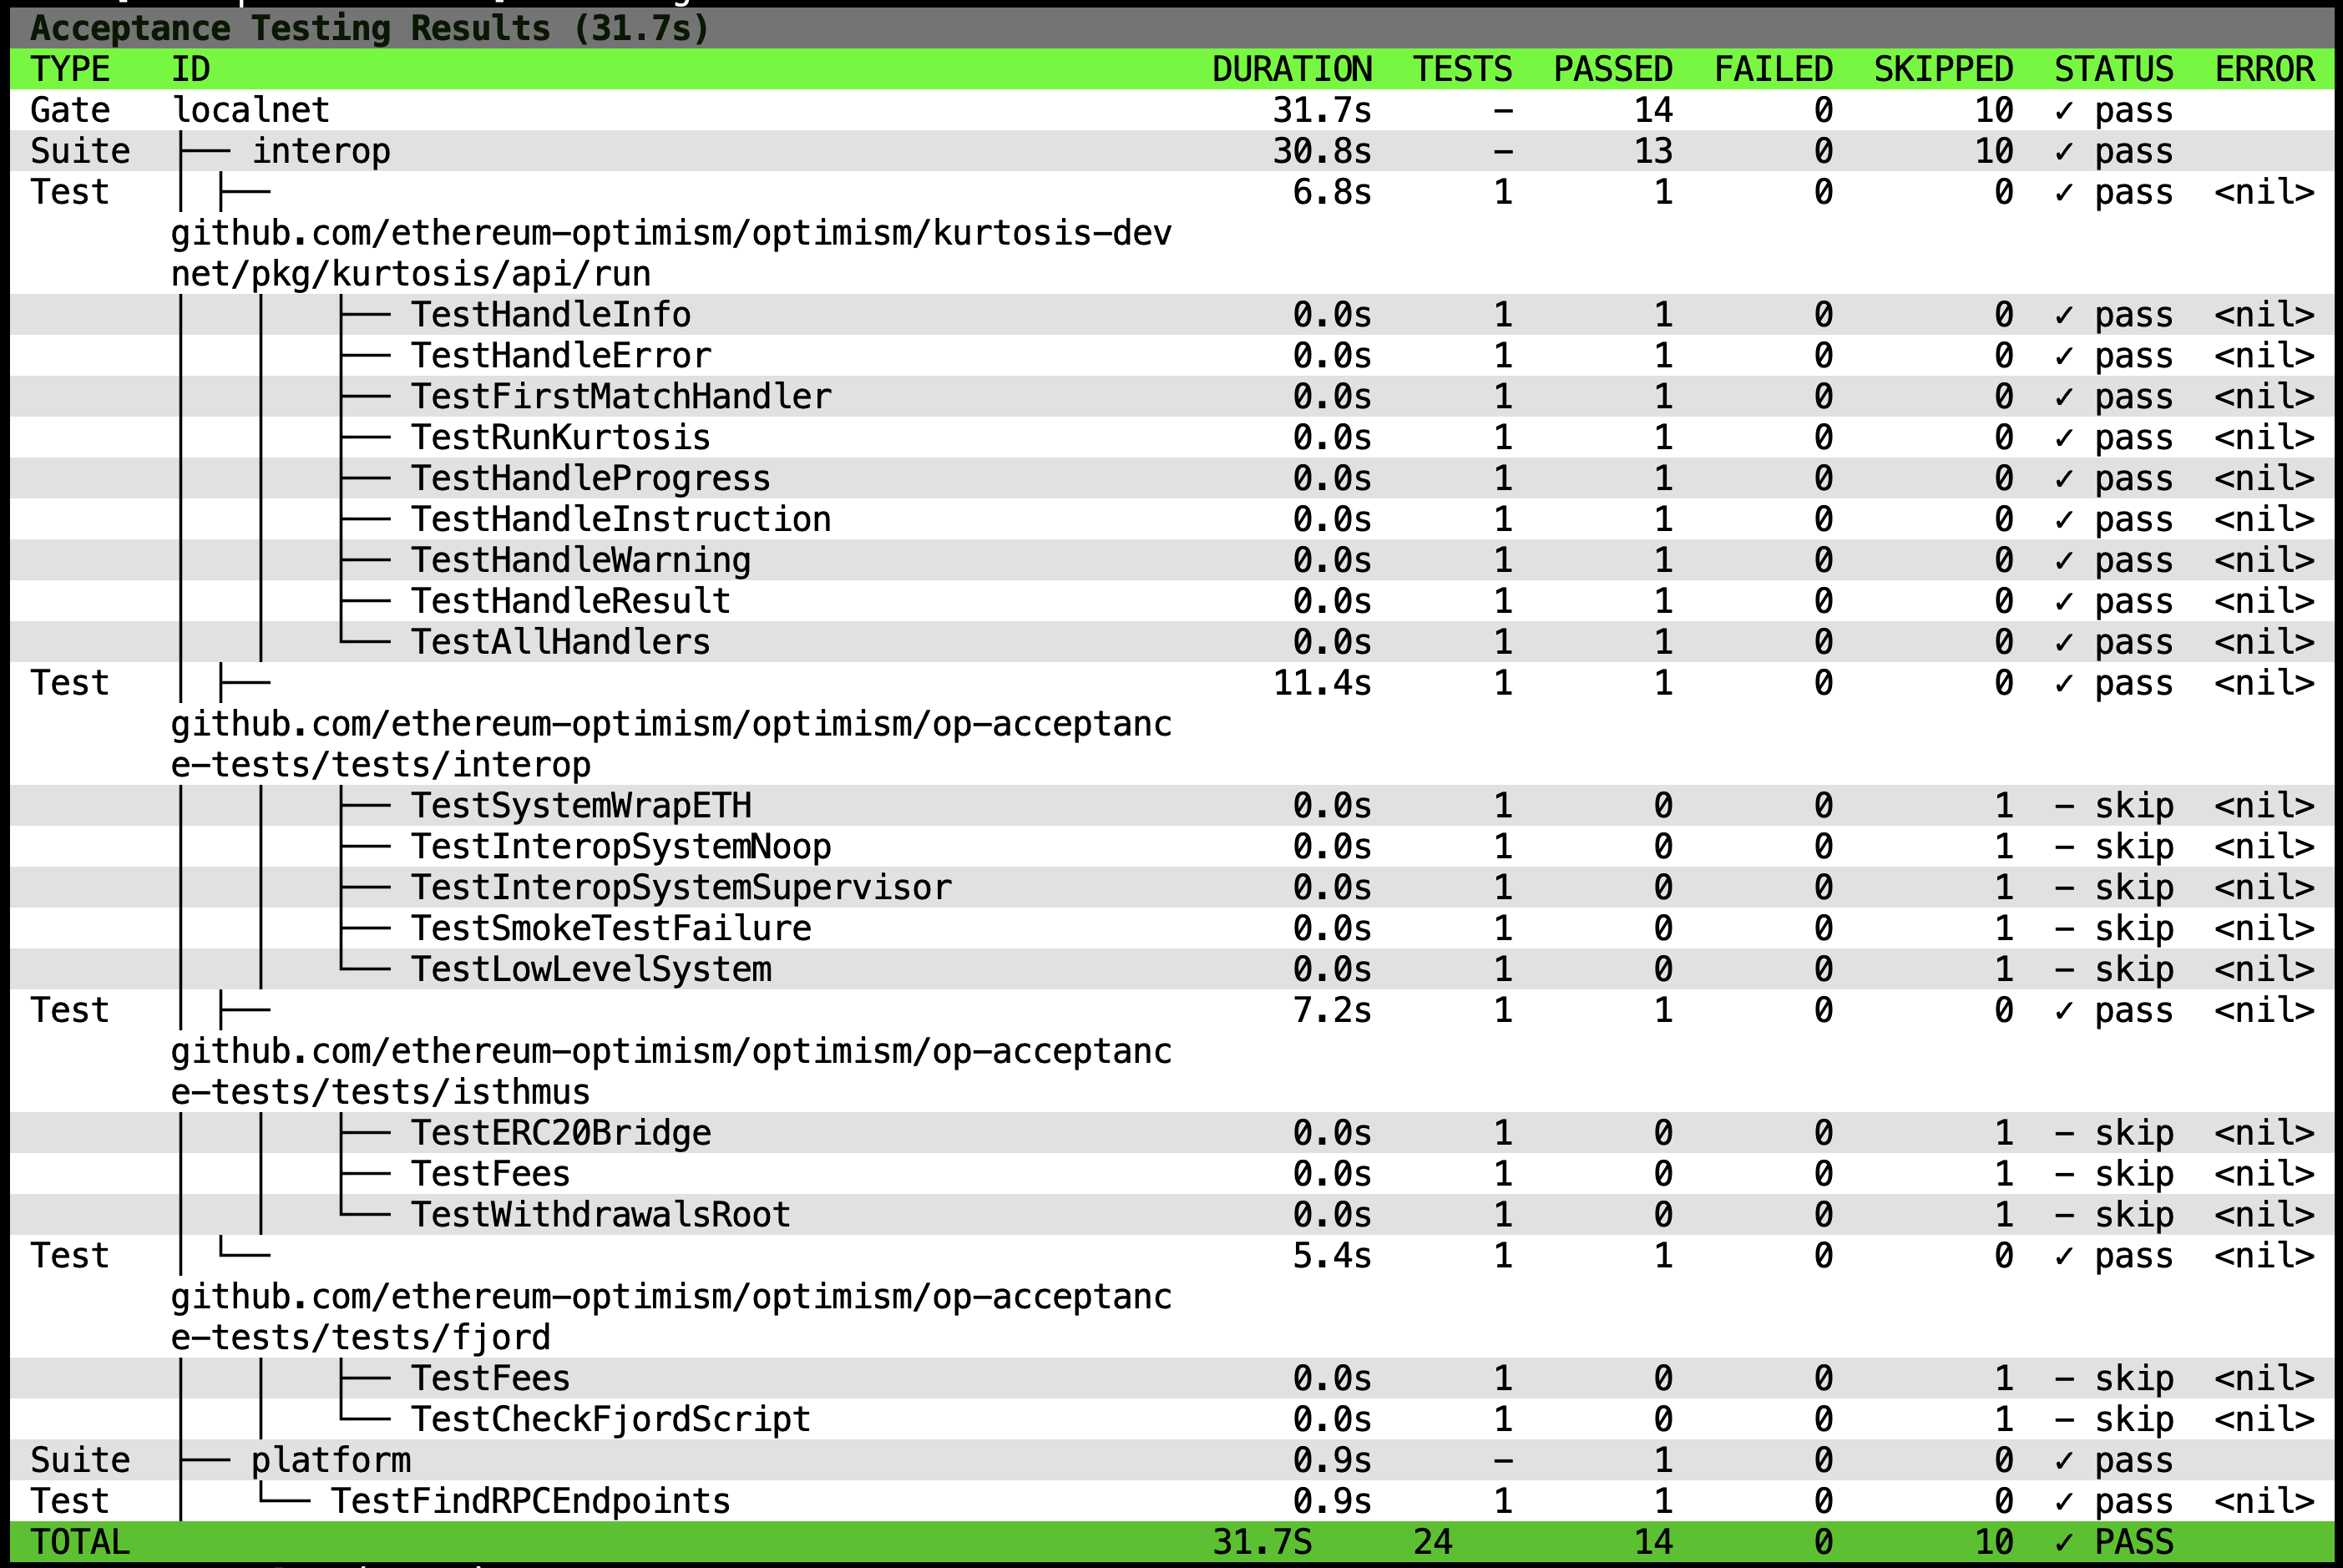
Automated Testing
Run automated acceptance tests using op-acceptor.
- Use the appropriate feature gate for the target network. This should not be
base, but will include it. It should be one of the latest forks, such asinteroporflashblockswhich pertains to what the network is deployed as and testing.
The command will be something like so:
# Navigate to the optimism monorepo
cd optimism/op-acceptance-tests;

# Set your DEVNET_ENV_URL to point to the absolute path of
# your target networks devnet-env.json
DEVSTACK_ORCHESTRATOR=sysext
DEVNET_ENV_URL=/path/to/the/network/devnet-env.json

$(mise which op-acceptor) \
--testdir ../optimism \
--gate interop \
--validators ../acceptance-tests.yaml \
--log.level INFO
Manual Testing
Manually run any non-automated feature tests. (Note: This is a temporary step until we automate all of our current tests. Going forward we aim to have no manual feature tests.)
Load Testing
Run automated acceptance tests using op-acceptor
- Use load-testing gate for the network